Digging deep into Windows 10
Windows 10’s constantly evolving nature means fresh features usually arrive twice per year, most recently via the May 2021 “21H1” Update that recently released (though depending on when you read this, you may need to actively seek it out). With all the new goodies come a legion of new tweaks and tricks—some of which unlock powerful functionality hidden to everyday users. Others simply let you mold the Windows 10 experience into the shape you see fit. Here are some of the most useful tweaks, tricks, and tips we’ve found over Windows 10’s many iterations.
Be warned: Some of these may break as the operating system evolves given Microsoft’s new “Windows as a service” mentality. The Cortana digital assistant served as a cornerstone for the operating system since Windows 10’s inception, for example, but relegated to lowly app status in 2020. We’ve updated this article over time to reflect the OS’s current status.
The leveled-up Game Bar
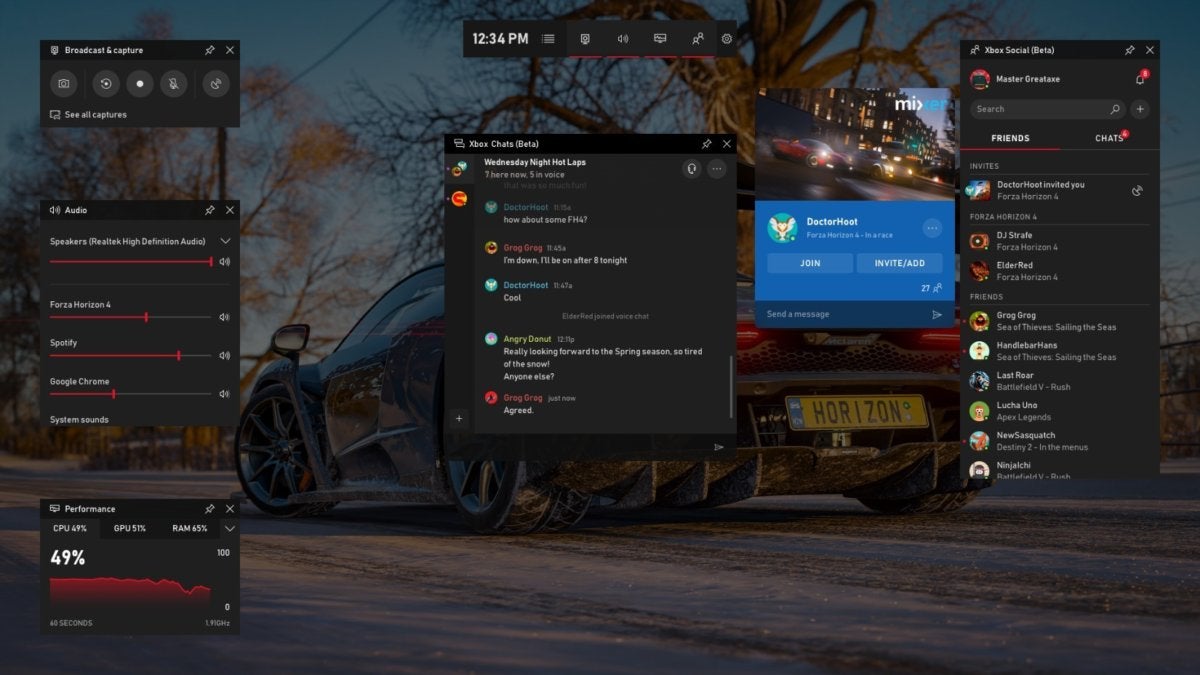
Image by Microsoft
If you’re into playing around on your PC, Windows 10’s Game Bar—summoned by pressing Windows + G in-game—holds all sorts of nifty extras. It’s always been able to take screenshots or videos of gameplay clips, but it also offers easy-peasy Beam game streaming and the intriguing Game Mode. Better yet, the May 2019 Update transformed it into a full blown overlay that does stuff no rivals offer. The now-customizable interface packs a performance widget, an audio widget with system-wide and per-app controls, a Discord-like interface for Xbox Live friends, a photo gallery, and even full Spotify integration. It’s great, and the May 2020 Update added more helpful features in the form of a frame rate counter and GPU temperature monitoring.
The Game Bar’s handy even if you don’t actually play, as it can be used to record video of any app—not just games. Windows 10 also has a dedicated Gaming section in its Start menu Settings to let you tinker with options, including Xbox networking and parental controls.
Windows Timeline
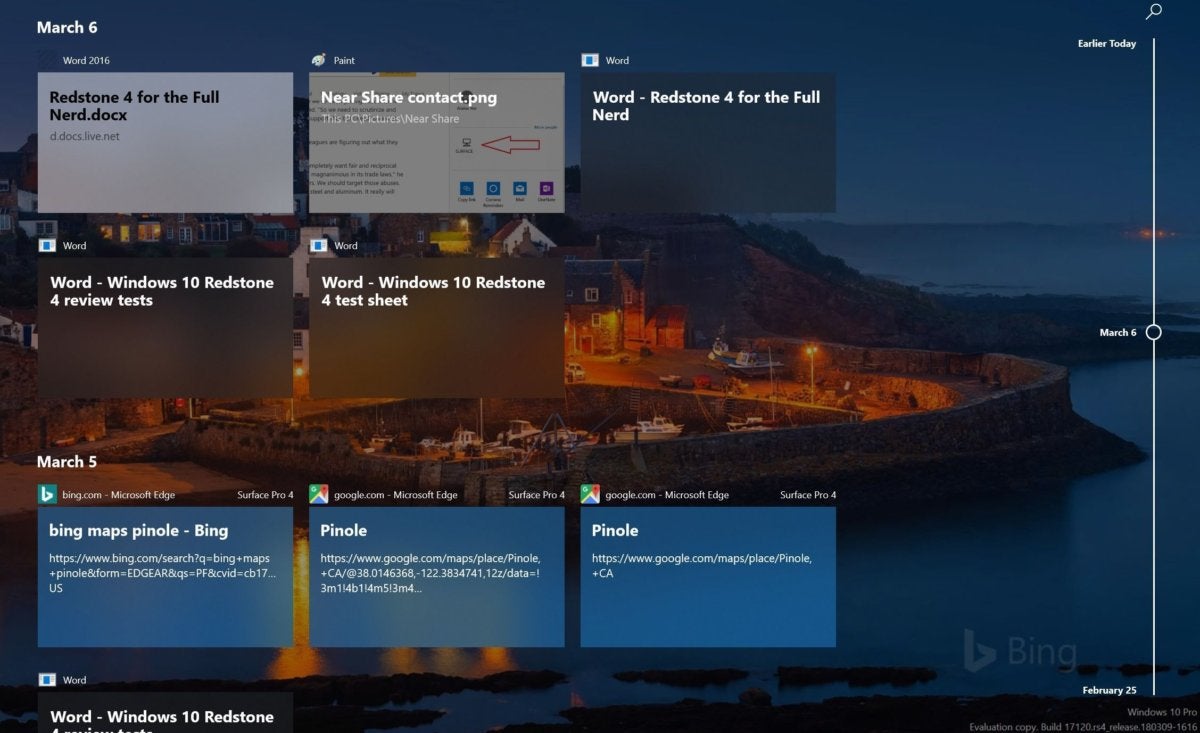
Image by Mark Hachman/IDG
Timeline helps you pick up where you left off. Clicking the Task View button in the taskbar or pressing Windows Key + Tab summons the feature, which displays a—you guessed it—time line of your activity in supported apps, stretching back over the past. Even more handily, Microsoft lets you group related apps together into “Activities” in Timeline, so that when you open that week-old budget document, for example, the presentations and websites you referenced at the time can be easily summoned as well. This even syncs across devices so it could be especially useful if you use multiple PCs, though Microsoft sadly plans to kill Timeline’s cross-device syncing soon.
The fly in the ointment: Only a limited number of apps work with Timeline, though Microsoft offers tools for developers to bake in support. That includes Office, Adobe’s Creative Cloud, and native Windows 10 apps like News and Maps, as well as Microsoft Edge and Google’s Chrome browser (after you install a Microsoft extension). You can deactivate Timeline by heading to Settings > Privacy > Activity History.
Your Phone ties Windows to your phone
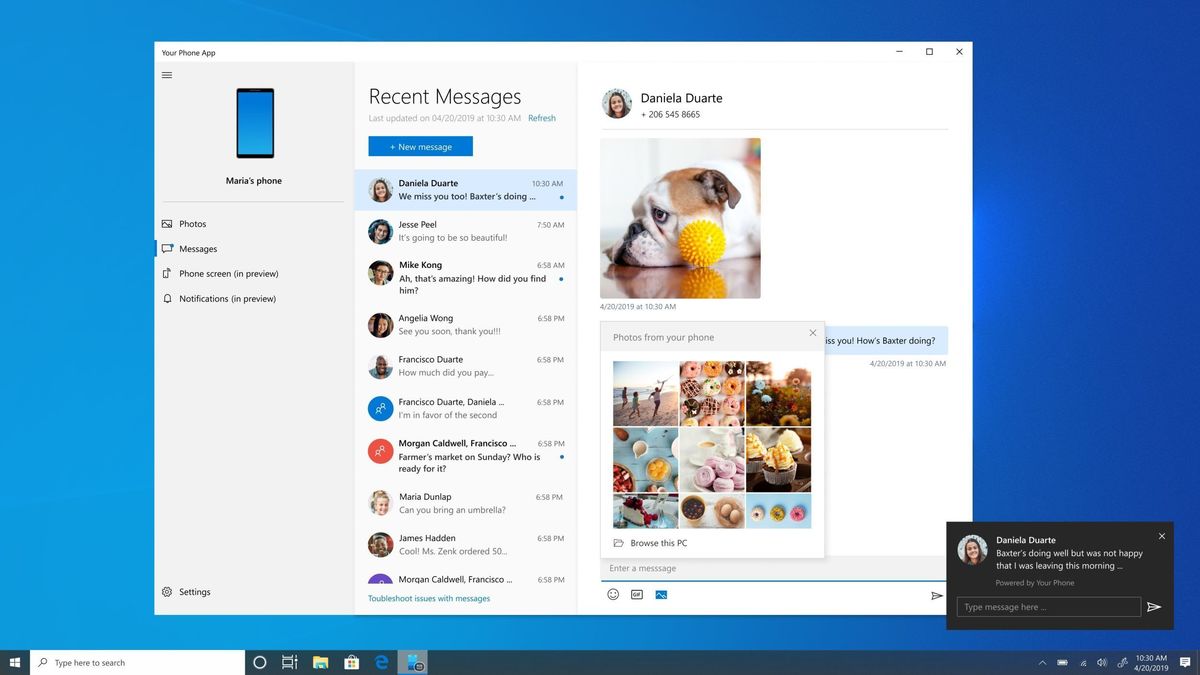
Image by Microsoft
Want to tie your phone and PC closer together? With the right combination of phone and PC, the Your Phone app on Windows can now show recent photos shot with the phone, view and send SMS messages, be alerted with the phone’s notifications, see the phone’s battery life, view and interact with the phone screen and apps, and even make calls.
You’ll need the Your Phone app for Android as well, of course. There’s also an iPhone app but it’s much more limited. Check out our Your Phone tutorial for everything you need to know.
Cloud clipboard
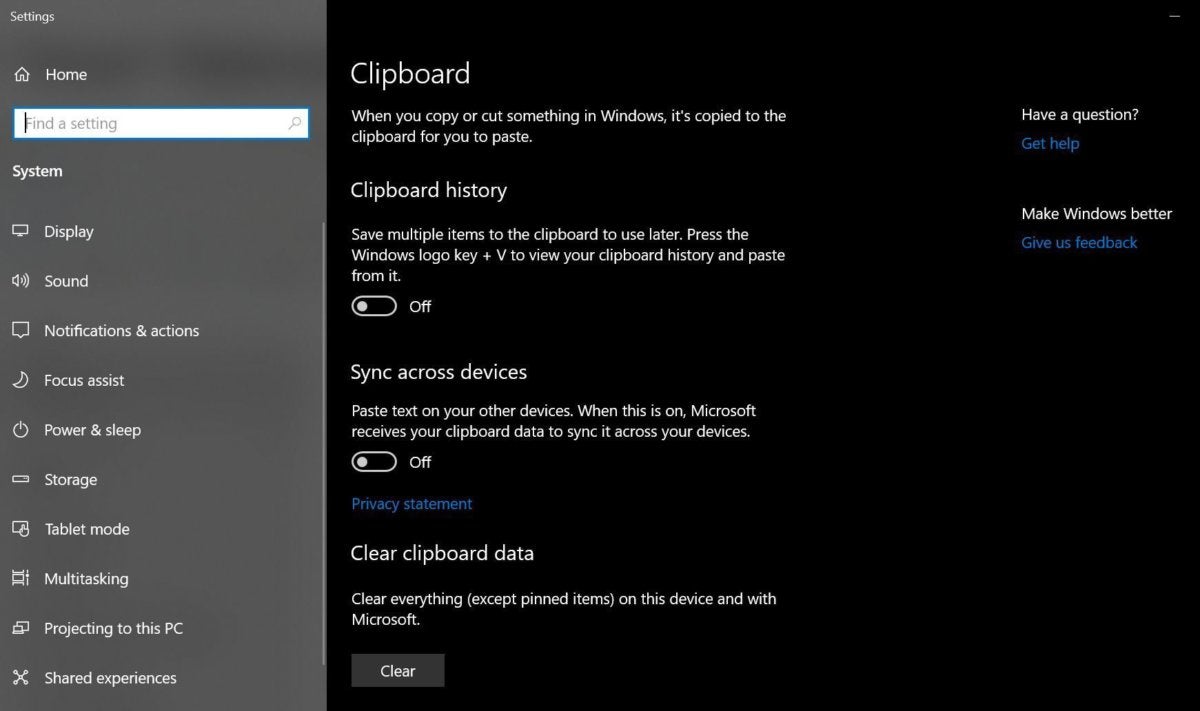
Image by Brad Chacos/IDG
Windows 10’s copy and paste functionality has been hit and miss for years, but now you can deploy that bugginess across multiple PCs with cloud clipboard—a genuinely useful feature introduced in the October 2018 Update. Head to Start > Settings > System > Clipboard and enable “Sync across devices” to start copying data on one PC and pasting it on another PC.
While you’re in this menu, enabling “Clipboard history” lets you save multiple items to the clipboard so you can use them again later. Nifty stuff.
Linux in Windows
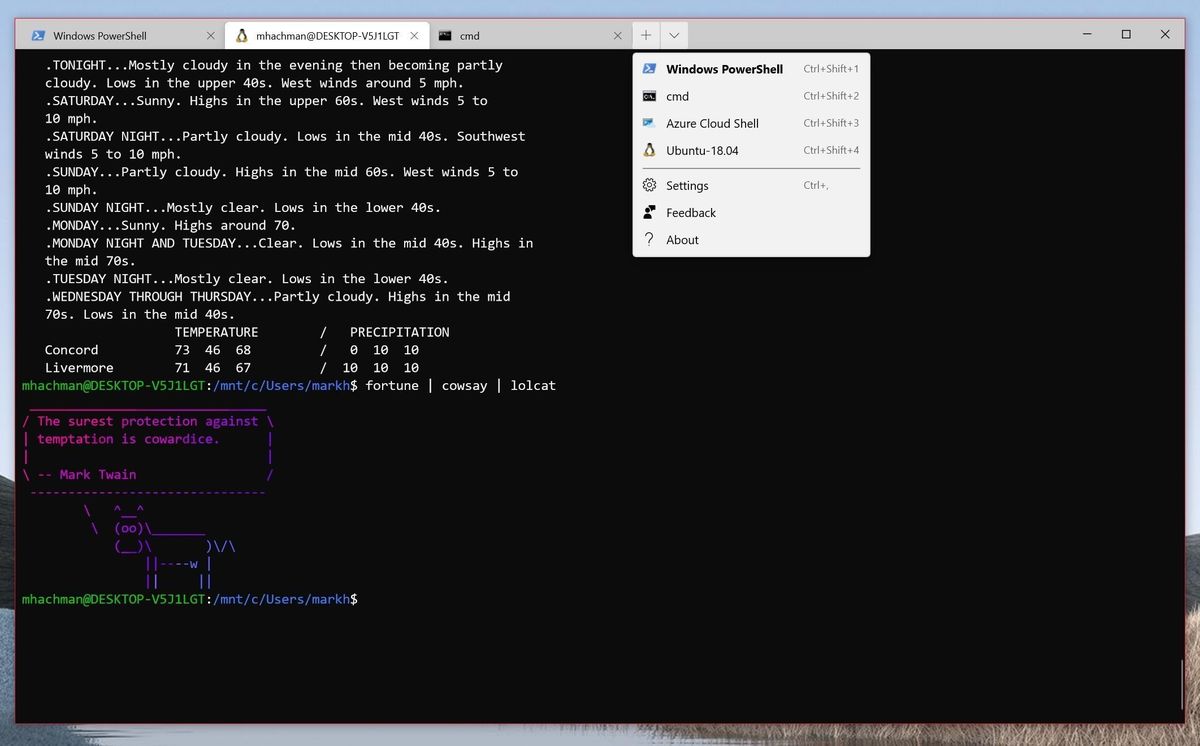
Image by Mark Hachman/IDG
It started with the simple Bash shell, but over the years, Microsoft’s built up its Windows Subsystem for Linux (WSL) into a surprisingly robust feature for developers. The latest iteration, dubbed WSL2, now runs Linux on its own kernel in what’s essentially a virtual machine, improving performance. You can even store files within the Linux root file system, then access them via Windows File Explorer inside the Linux virtual hard disk. You’ll need to enable the optional Linux compatibility and download a Linux distro from the Microsoft Store to use it, though. Several distros are available, including Ubuntu, Debian, OpenSUSE, and Kali.
Microsoft is building a graphical interface for Linux apps into WSL2, but the feature works best as a command line-style interface for now. It pairs very well with Microsoft’s awesome Terminal text editor, pictured above, which lets you manage Linux, PowerShell, and command line tools simultaneously.
Windows Sandbox
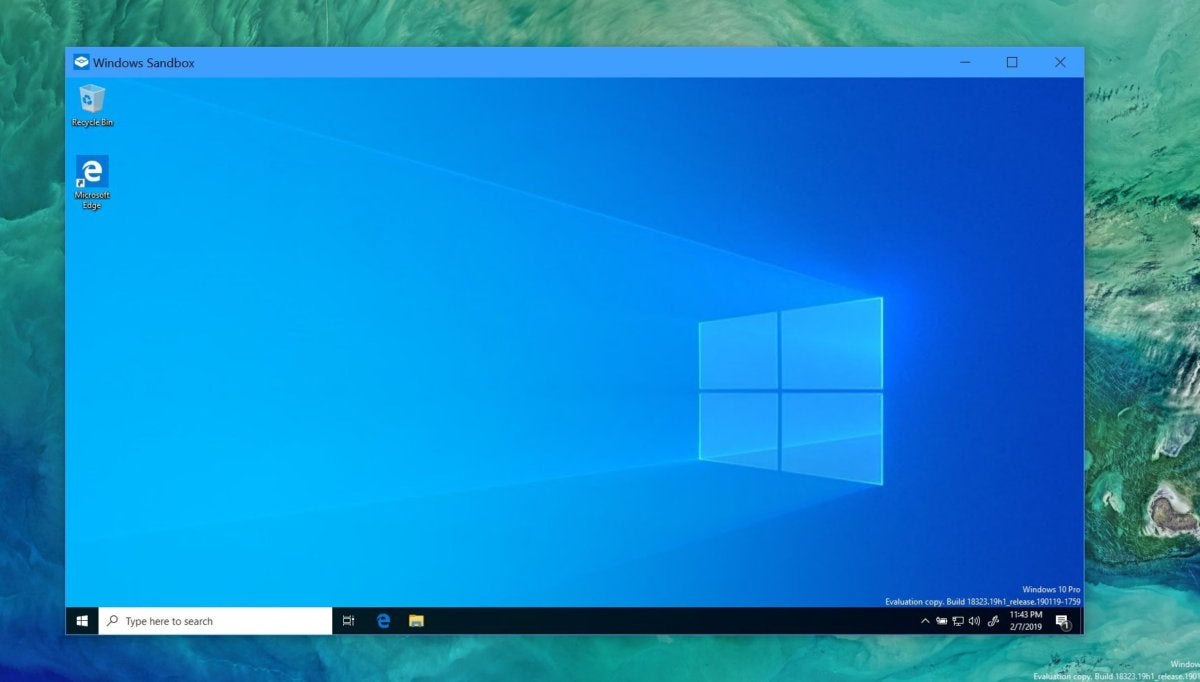
Image by Mark Hachman/IDG
Introduced in the Windows 10 May 2019 Update, Windows Sandbox makes it easy to test unknown software and websites in a safe environment. The feature basically creates a virtualized second copy of Windows within Windows where you can run untrusted tasks, firewalled from your main installation. If things go pear-shaped, just nuke the virtual PC and start anew. Easy-peasy! And if a file checks out, you can move it out of quarantine and copy it over to Windows 10 proper. The May 2020 Update adds the ability to enable networking and your PC’s GPU within Sandbox, and even a shared folder between Sandbox and your PC’s desktop, if you don’t mind the increased threat risk.
The one downside to Windows Sandbox: It’s only available in Windows 10 Pro. Our Windows Sandbox guide explains everything you need to know.
Adjust your monitor’s refresh rate
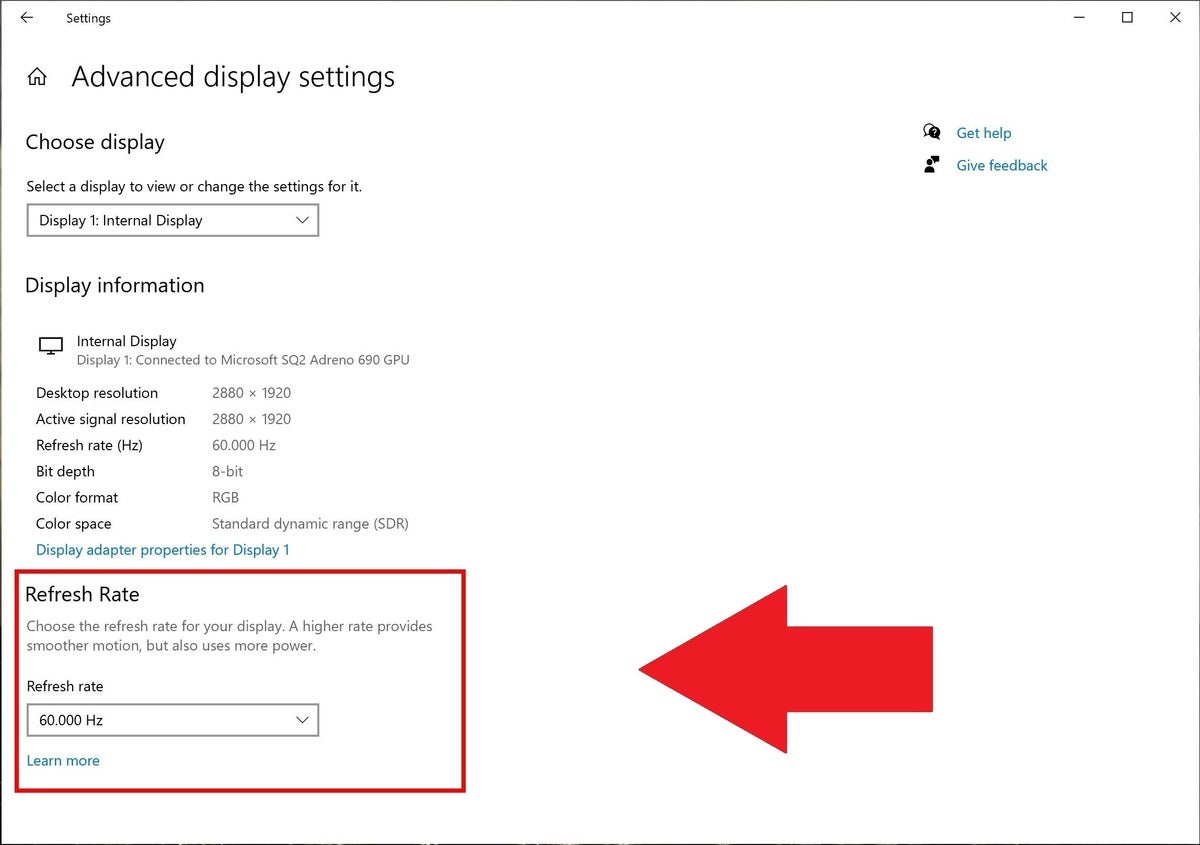
Image by Mark Hachman/IDG
It’s taken endless iterations and dozens of years, but as of the October 2020 Update, Windows 10’s display settings finally let you adjust your monitor’s refresh rate. Hallelujah. Before now, you needed to adjust your frame rate by diving into the Device Manager’s arcane settings, or using software provided by Nvidia or AMD if you had a compatible graphics card.
Now, you can tweak your monitor’s refresh rate in Windows 10’s Settings hub (System > Display > Advanced Display Settings). This tip mostly applies to gamers who buy monitors with above-average refresh rates. Often, high refresh rate monitors auto-configure to render images at a standard 60Hz, rather than the higher, smoother options available with such displays. Now it’s easy to check and fix.
If you have an especially fast monitor and worry about power usage, this new Display Settings ability also makes it easy to crank your refresh rate quickly when you want to game, and dial it back down for basic desktop use. Most people will want to run their maximum refresh rate universally.
Emoji and kaomoji keyboard

Image by Microsoft
You may not know it, but Windows 10 matches the capabilities of mobile operating systems via a handy-dandy integrated virtual emoji keyboard, and one-ups phones by including support of ASCII-made kaomoji, too! (⌐■_■)
To summon it, simply press the Windows key and ; simultaneously on your keyboard while you’re inputting text. The selection is only getting better too, as Microsoft has been adding more emoji and kaomoji with each major Windows 10 feature update.
Snip & Sketch
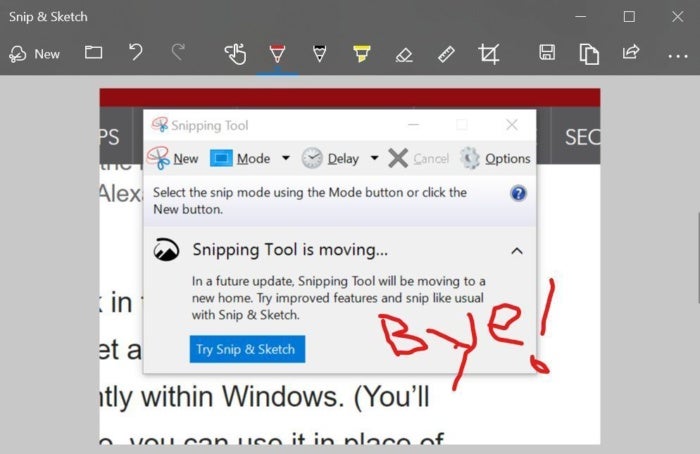
Image by Brad Chacos/IDG
The firmly entrenched Snipping Tool within Windows is finally getting replaced and upgraded. Snip & Sketch is a new tool that lets you select a portion of the screen to copy when you press Windows + Shift + S. After doing so, the selected screenshot will be copied to your clipboard, so you can paste it into any image editing software—including the standalone Snip & Sketch app, which lets you annotate and share your marked-up images.
Near Share
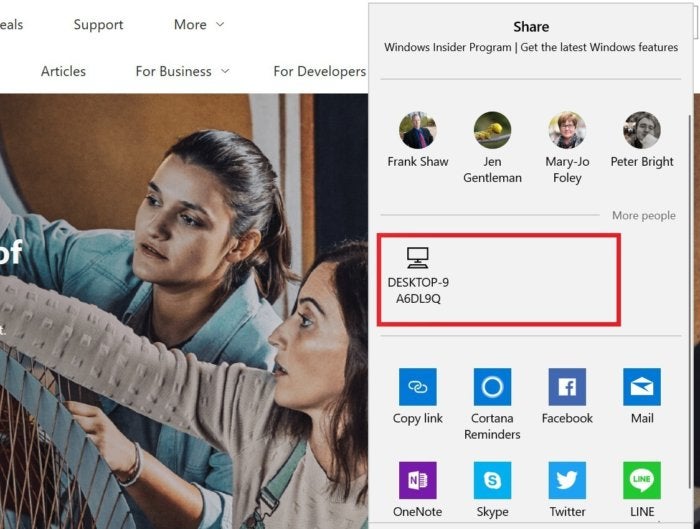
Image by Microsoft
Near Share makes it easy to share files and URLs with local PCs over the air, negating the need for flash drives or chat apps to pass something along. If you open the Share interface in Microsoft Edge or File Explorer, you’ll see PCs with Nearby Sharing enabled appear as an option. Recipients receive a pop-up notification when something is sent. Think of it as an alternative to Apple’s Airdrop, albeit one without any mobile support.
To use Near Share, your computer needs both Bluetooth and Wi-Fi working, and you’ll have to enable the Nearby Sharing option in Settings before you can start using it. Transfer speeds were pretty slow and Bluetooth-like in our tests, so you may still want to resort to alternative means to pass especially large files around. Microsoft says the feature automatically chooses to use Wi-Fi or Bluetooth depending on what’s available, and what’s faster.
Ransomware protection
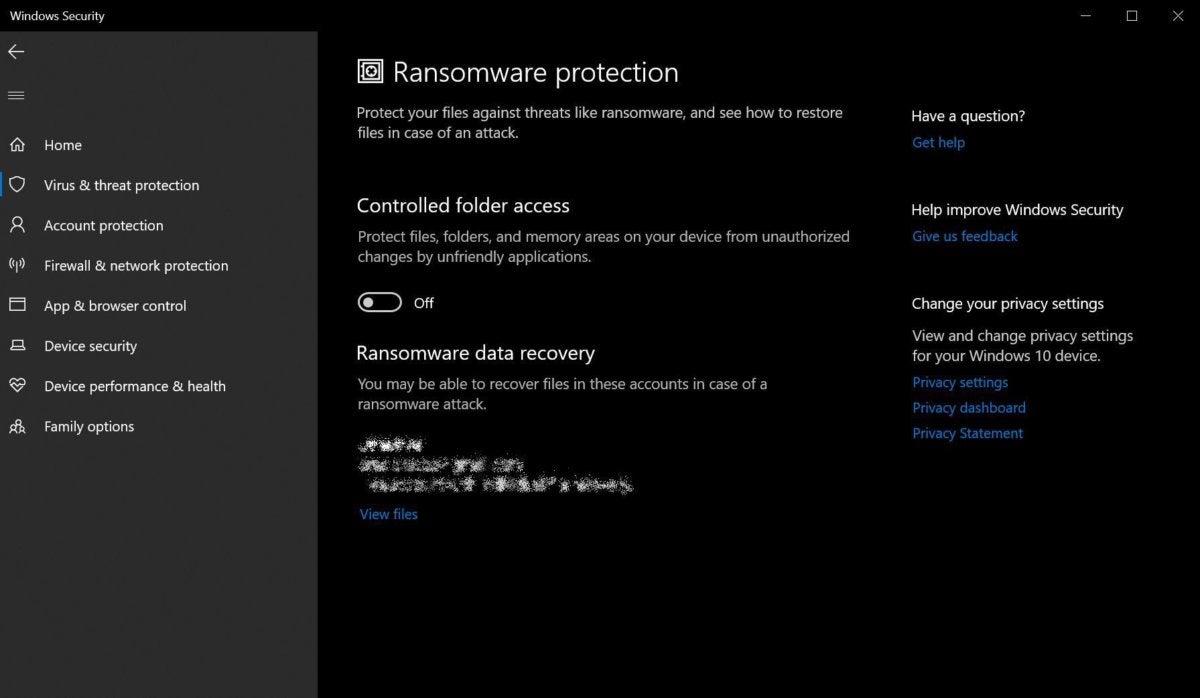
Image by Brad Chacos/IDG
Ransomware is a growing (and damned nasty) problem. It infects PCs, encrypts your files, and holds everything hostage until you pay a ransom—hence the name. The best defense against ransomware is frequent backups and strong security software, but Windows 10 now includes basic protection right in your operating system.
Controlled Folder Access “protects your files and folders from unauthorized changes by unfriendly applications.” Your Documents, Pictures, Movies, and Desktop folders are protected by default, though you can block other folders manually or whitelist trusted software to access your locked-down info. You can tweak Controlled Folder Access by opening the Windows Security app (formerly Windows Defender), heading to the Virus & threat protection tab, and clicking the “Manage ransomware protection” link at the bottom.
Dark theme
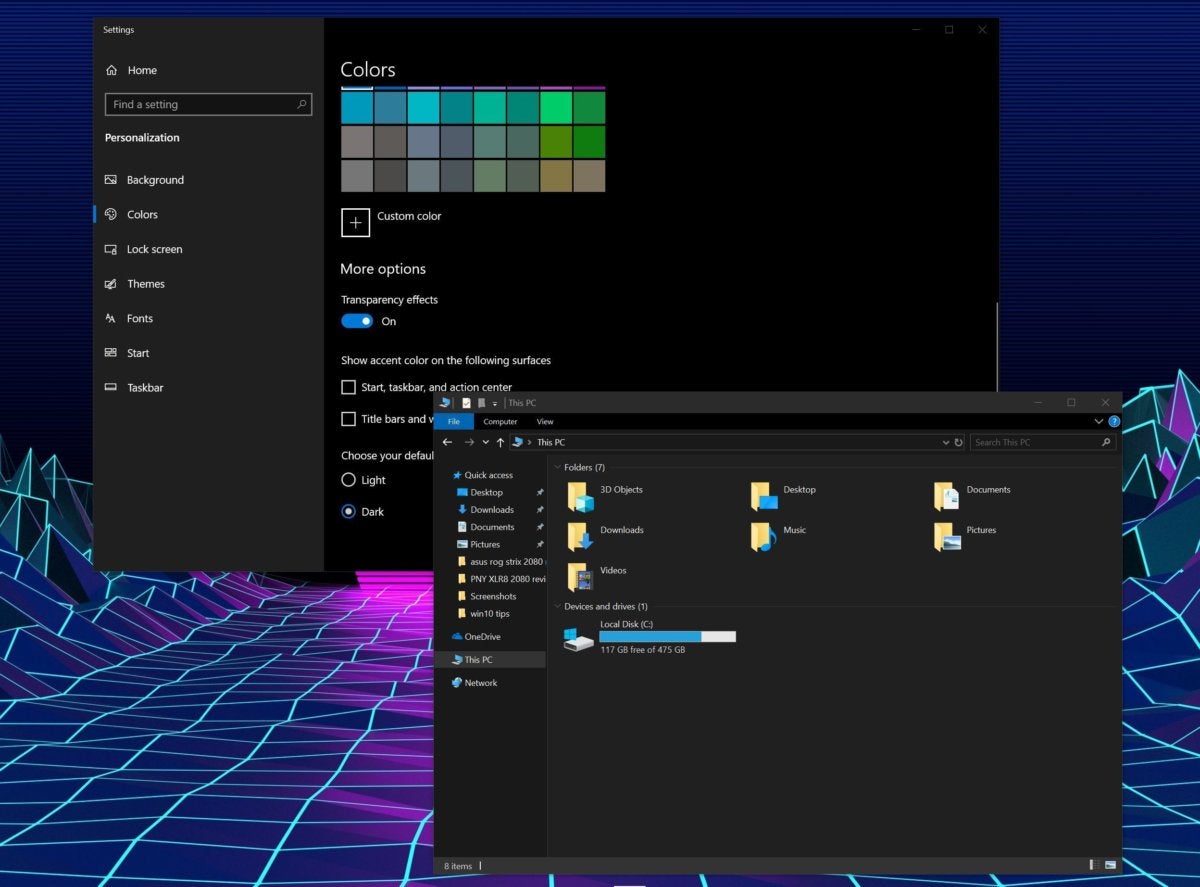
Image by Brad Chacos/IDG
If you love dark themes, you love dark themes. Light themes sear your eyeballs. Fortunately, Windows 10 now supports a dark theme. Head to Start > Settings > Personalization > Color and select the “dark” option under “Choose your default app mode.” The Windows 10 October 2018 Update extended the dark theme to include File Explorer, too. Enjoy!
Dynamic Lock
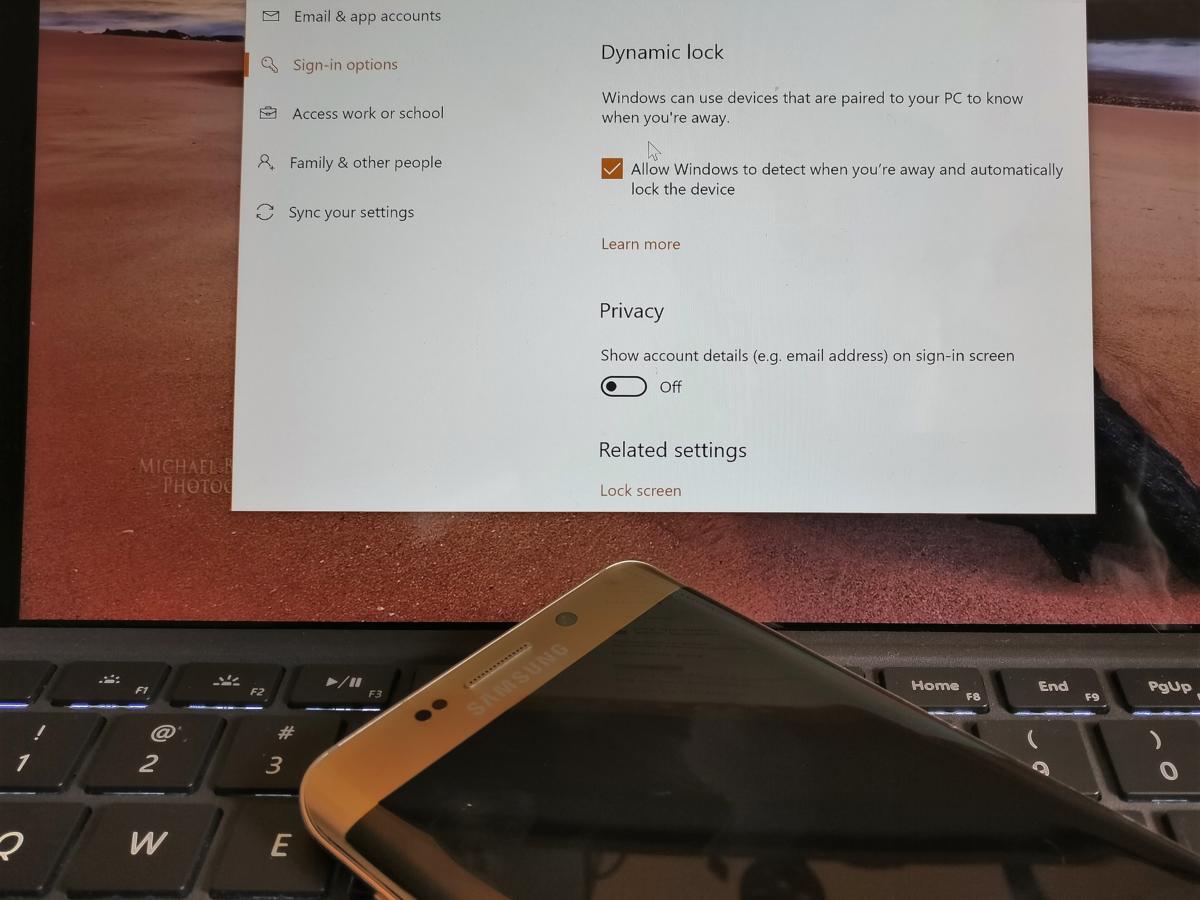
Image by IDG / Mark Hachman
Adios, Windows + L. Dynamic Lock is a handy feature that pairs your PC with your phone over Bluetooth, then automatically locks your computer when you wander away from it. To start using it, marry the two devices in Control Panel > Hardware and Sound > Devices and Printers, then activate Dynamic Lock at Settings > Account > Sign-in options.
PCWorld’s extensive Dynamic Lock guide can walk you through everything you need to know about the feature, including in-depth tips that let you fine-tune details like activating the feature at a shorter range.
Per-app GPU management
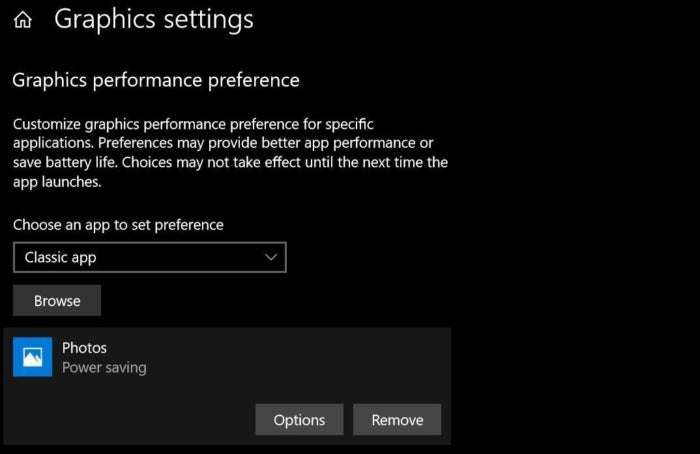
Image by Mark Hachman/IDG
The Windows 10 April 2018 Update added the ability to tell Windows which graphics hardware—discrete or integrated—to use when you open specific apps. It sounds niche, but the feature could prove pretty helpful if you’ve got a gaming laptop and want it to last longer. By default, booting up a game switches over to discrete graphics, which use a lot more energy than the graphics cores integrated in Intel chips and AMD Ryzen APUs. But a lot of indie and retro games play just fine on integrated graphics. With Windows 10’s per-app GPU management, you can manually tell the system to stick to the more power-efficient option for games that don’t need the extra oomph.
Go to Settings > Display, then click the Graphics settings link at the very bottom of the page to start tinkering.
OneDrive Files on Demand

Image by Mark Hachman/IDG
It’s back, huzzah! OneDrive Files on Demand resurrects Windows 8.1’s “placeholder” feature for the cloud storage service baked into Windows 10. OneDrive Files on Demand shows all of the files you have stored in OneDrive in a folder on your PC, but they’re just pointers synced with the cloud—not actually files installed on your PC. Unless you want them to be. You can select which files and folders to make available locally.
Intrigued? Check out PCWorld’s guide to how to turn on OneDrive Files on Demand.
Storage Sense
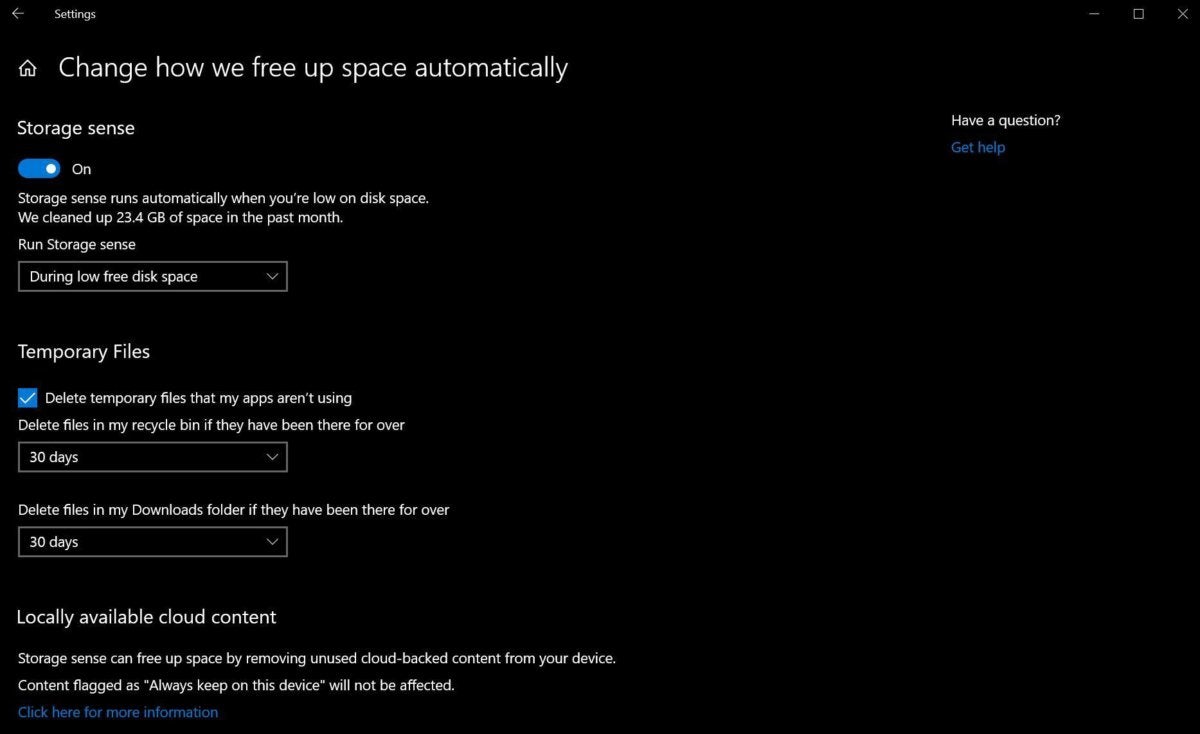
Image by Brad Chacos/IDG
Over time, your PC can quietly fill with needless junk without your even realizing it, as the Recycle Bin and temporary files suck up your storage. Storage Sense helps combat the creep. Head to Settings > System > Storage and enable the Storage Sense option to have Windows start automatically clearing out unneeded temporary files, and deleting any files in your Recycle Bin over 30 days old. You can tweak those options using the Change how we free up space link underneath the option.
The October 2018 Update added the ability to have Storage Sense send long-untouched files from anywhere on your computer to your OneDrive cloud storage, freeing up space on your hard drive. It could be a useful addition if you’re close to filling up your local storage, but keep an eye on your available OneDrive space—cloud storage isn’t free. Fortunately, the feature includes granular controls.
Night Light
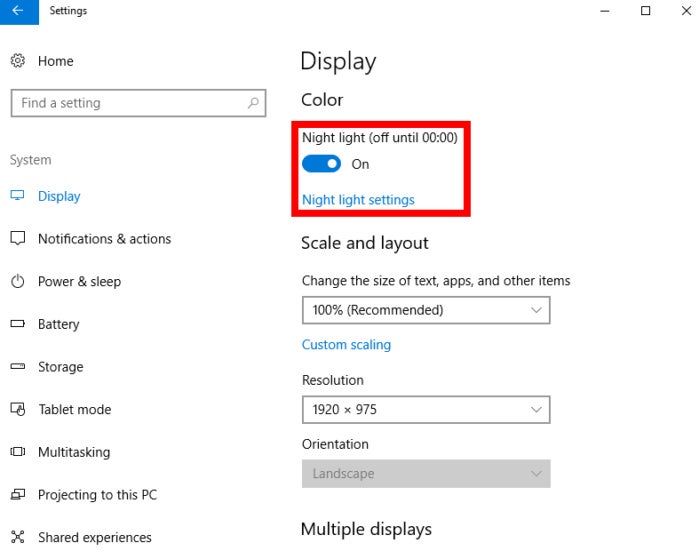
Image by Ian Paul/PCWorld
Night Light spares your eyes as you browse the evening away. It swipes functionality from the beloved f.lux app to adjust your screen’s color temperature during after-dark computing sessions. That makes it easier to fall asleep when you’re done.
To activate Night Light, head to Settings > System > Display. Once you’ve done so, open the feature’s settings to fine-tune its behavior. PCWorld’s Night Light primer can help walk you through your options.
Audio source switching
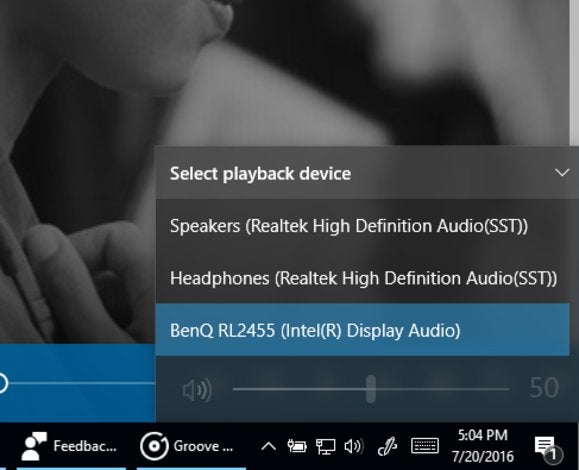
Windows 10’s in-taskbar volume controls pack a niche, yet nifty touch: selectable sources. Clicking the audio device name in the volume controls summons a list of all connected audio outputs, meaning you can switch from your headphones to your speakers and back again without having to dive into the Control Panel. Yay!
The April 2018 Update added more granular audio options to the Settings app too, breaking them away from the Control Panel even further.
Spatial sound

Image by Blue Microphone
That’s not the only audio trick lurking within Windows 10. Windows Sonic for Headphones offers a virtual surround sound format that can make the audio coming from your headset feel more lush and atmospheric. The effectiveness of the feature varies depending on your gear and how sensitive you are towards audio cues.
To activate Windows Sonic, right-click the speaker/audio icon in the system tray on the right side of your task bar, then select Spatial sound (none). In the window that opens, click the drop-down menu and select Windows Sonic for Headphones. Click apply, then OK, and you’re done!
Bigger, bolder cursors
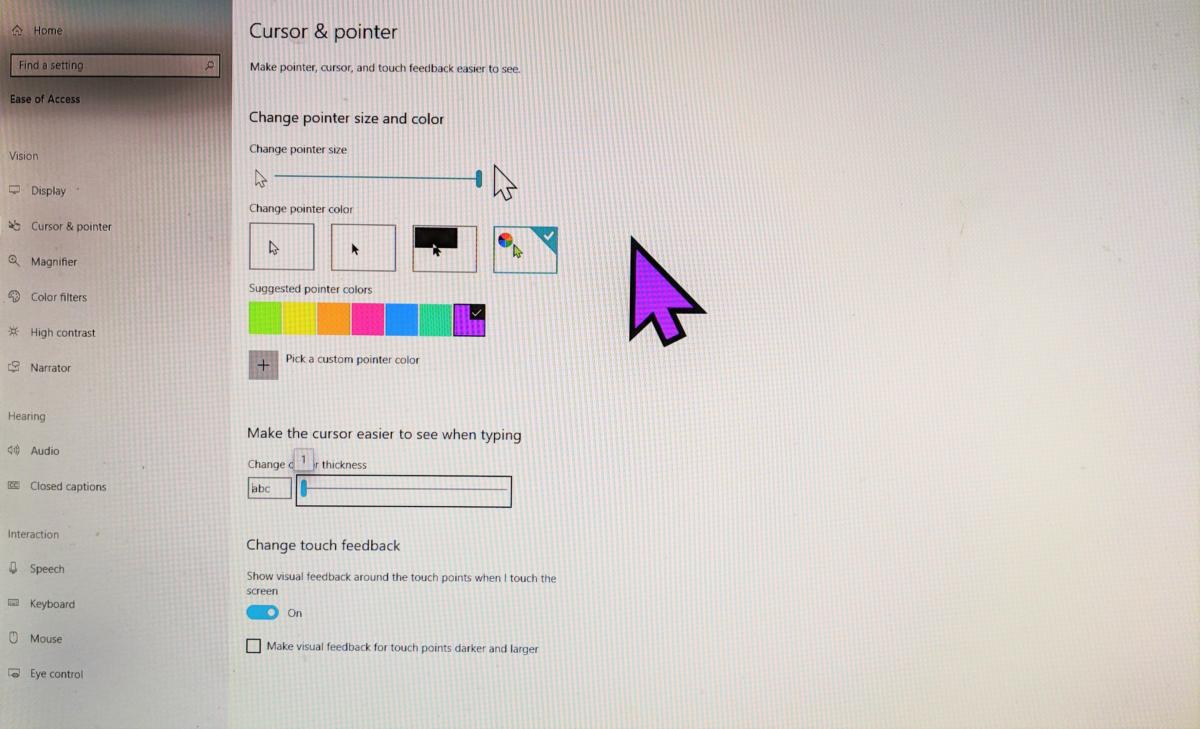
Image by Mark Hachman/IDG
You’ve always been able to adjust the size of your cursor within Settings > Ease of Access > Cursor & Pointer size, making it slightly larger and swapping its color from white to black. The Windows 10 May 2019 Update added far more, enabling you to blow up the cursor to gargantuan size and add various color options. Yes, it’s all in the name of usability, but it’s fun, too.
Turn off File Explorer’s Quick Access view
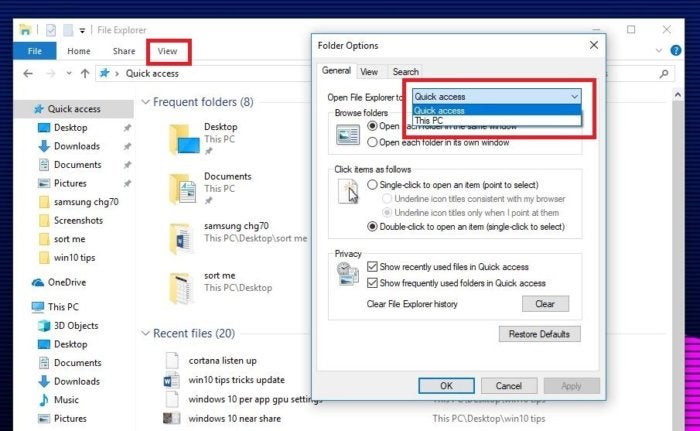
Image by Brad Chacos/IDG
When you open File Explorer in Windows 10, it defaults to a new Quick Access view that shows your most frequently accessed folders and recently viewed files. I love it, personally, but if you’d rather File Explorer defaulted to the “This PC” view found in Windows 8, here’s how.
Open File Explorer, then select View > Options from the Ribbon. A Folder Options window will open. Click the “Open File Explorer” drop-down menu at top, then select the “This PC” option. Click OK and you’re done!
Manage notifications
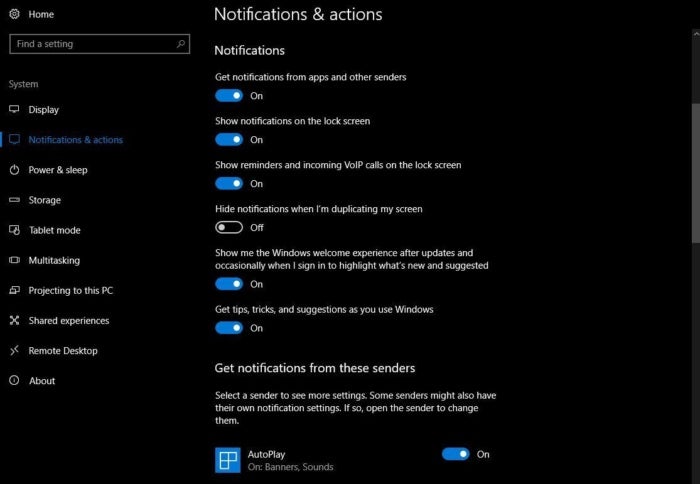
Image by Brad Chacos/IDG
Windows 10’s Action Center houses and manages the notifications spawned by your system’s various apps. You might not want every Microsoft Store app you install barking at you all the time, however, or maybe you don’t want to see any notifications while you’re in presentation mode. You might just want to silent the annoying ads that the Get Office app spawns. Fortunately, those are easy to tweak.
To tinker with you your notification settings, head to Start menu > Settings > Systems > Notifications and actions. Individual Windows Store apps, like the Mail app, tend to have more granular notification options in the Settings menus inside the apps themselves. Microsoft’s Focus Assist tool also contains options that limit which notifications appear when you’re playing games or other full-screen apps.
Reset your PC from the cloud
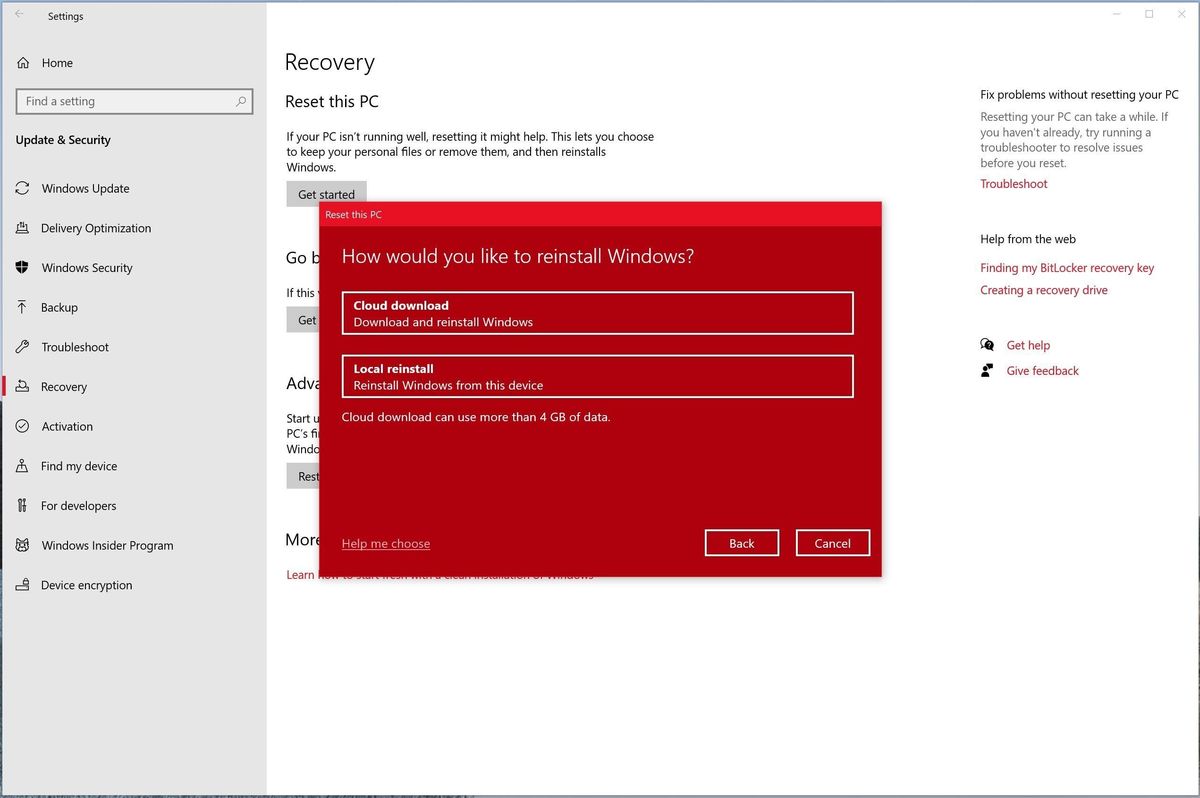
Image by Mark Hachman/IDG
When you reset your PC, cleaning all the gunk out with a fresh Windows install, the image that your PC installs and boots from is pulled from the image already residing on your PC. That’s fine, but extracting that image takes time, and it fail entirely if your PC’s hard drive is significantly corrupted. Enter Cloud Reset: As the name suggests, your PC can optionally download a new, clean image from Microsoft’s servers.
Yes.
Schedule your restarts
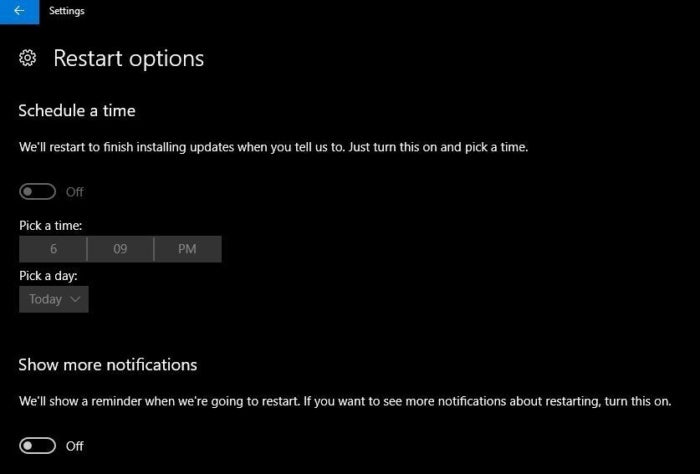
Image by Brad Chacos/IDG
This is wonderful. If you’ve got pending updates that require you to reboot your PC, Windows 10 will allow you to schedule a specific time for it to do so. Finally!
Open the Settings option in the Start menu, then head to Updates and Recovery > Windows Update > Restart options to see the scheduling screen above.
Get Windows updates from other sources
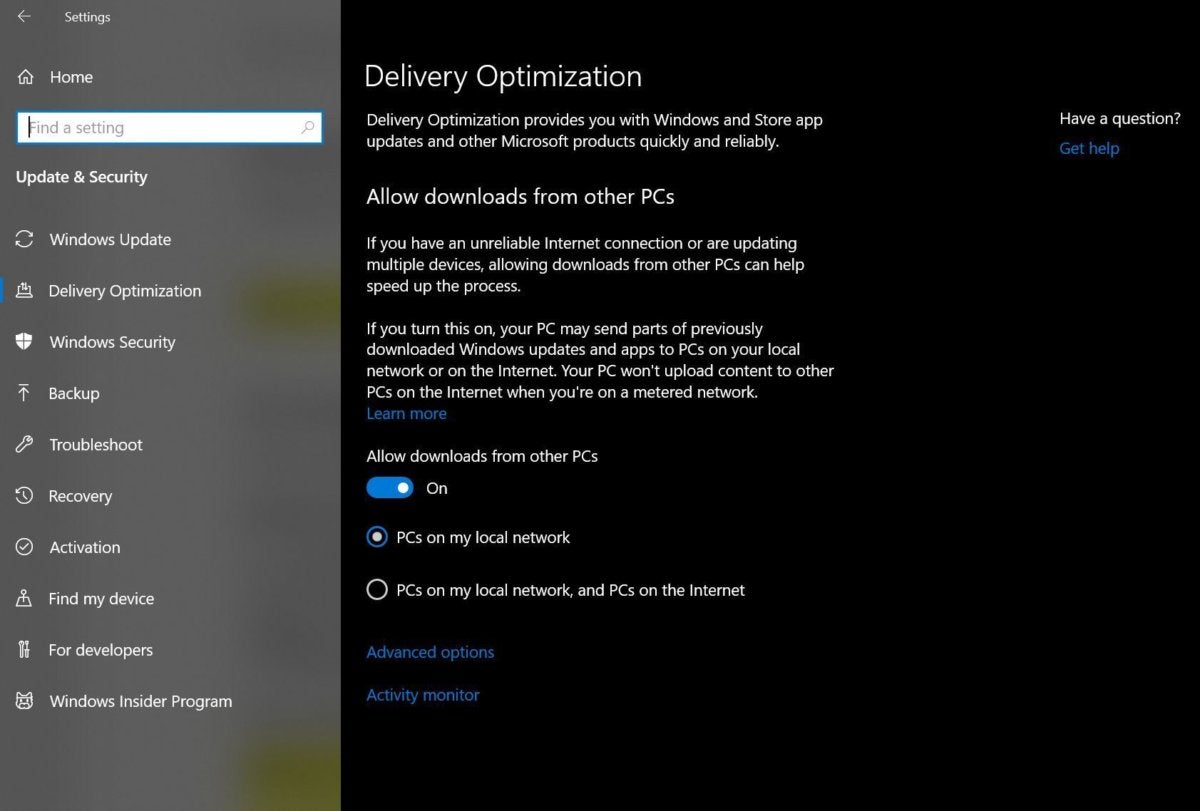
Image by Brad Chacos/IDG
But the Windows Update upgrades don’t end there. Windows 10 introduces a new option that lets you download updates using peer-to-peer technology, rather than Microsoft directly. It could help you get that hot security patch faster when everybody’s hammering Microsoft’s dedicated servers, or save you bandwidth in a computer-crowded house—just download the new patch once from Microsoft, then share it among the PCs under your care.
To tinker with the setting, head to Start > Settings > Update & Recovery > Delivery Optimization. By default, “Get updates from more than one place” is enabled and configured to grab updates from PCs on both your local network and the Internet at large. If you don’t like the idea of your PC using your bandwidth to share Windows Updates with strangers, be sure to disable it. If you leave it active, the “Advanced options” link lets you fine-tune how Windows uses your network to download and share updates, as you can see above.
Seize control of Windows Updates

While the ability to schedule installation times for updates is very welcome indeed, not everyone is happy about the way Windows 10 handles patches—specifically, that you can’t easily refuse them. You can delay downloading updates for some time, but eventually, Microsoft will force them on you.
There are some actions you can take to exert control over your Windows Update experience, however. Most notably, if you’re using Wi-Fi for connectivity, you can set Windows 10’s Wi-Fi connections as metered to download updates when you’d like to, rather than when Microsoft wants you to. The Active Hours feature lets you tell Windows specific times not to install updates. And if you ever encounter a borked update that refuses to play nice with your PC, Microsoft’s released a tool that allows you to choose individual updates so they won’t be downloaded again.
Those workarounds aren’t a replacement for being able to manually choose the Windows Update you’d like to install, but they should help ease the sting a little, at least.
Original article: https://www.pcworld.com/article/431494/windows-10-the-best-tips-tricks-and-tweaks.html


